
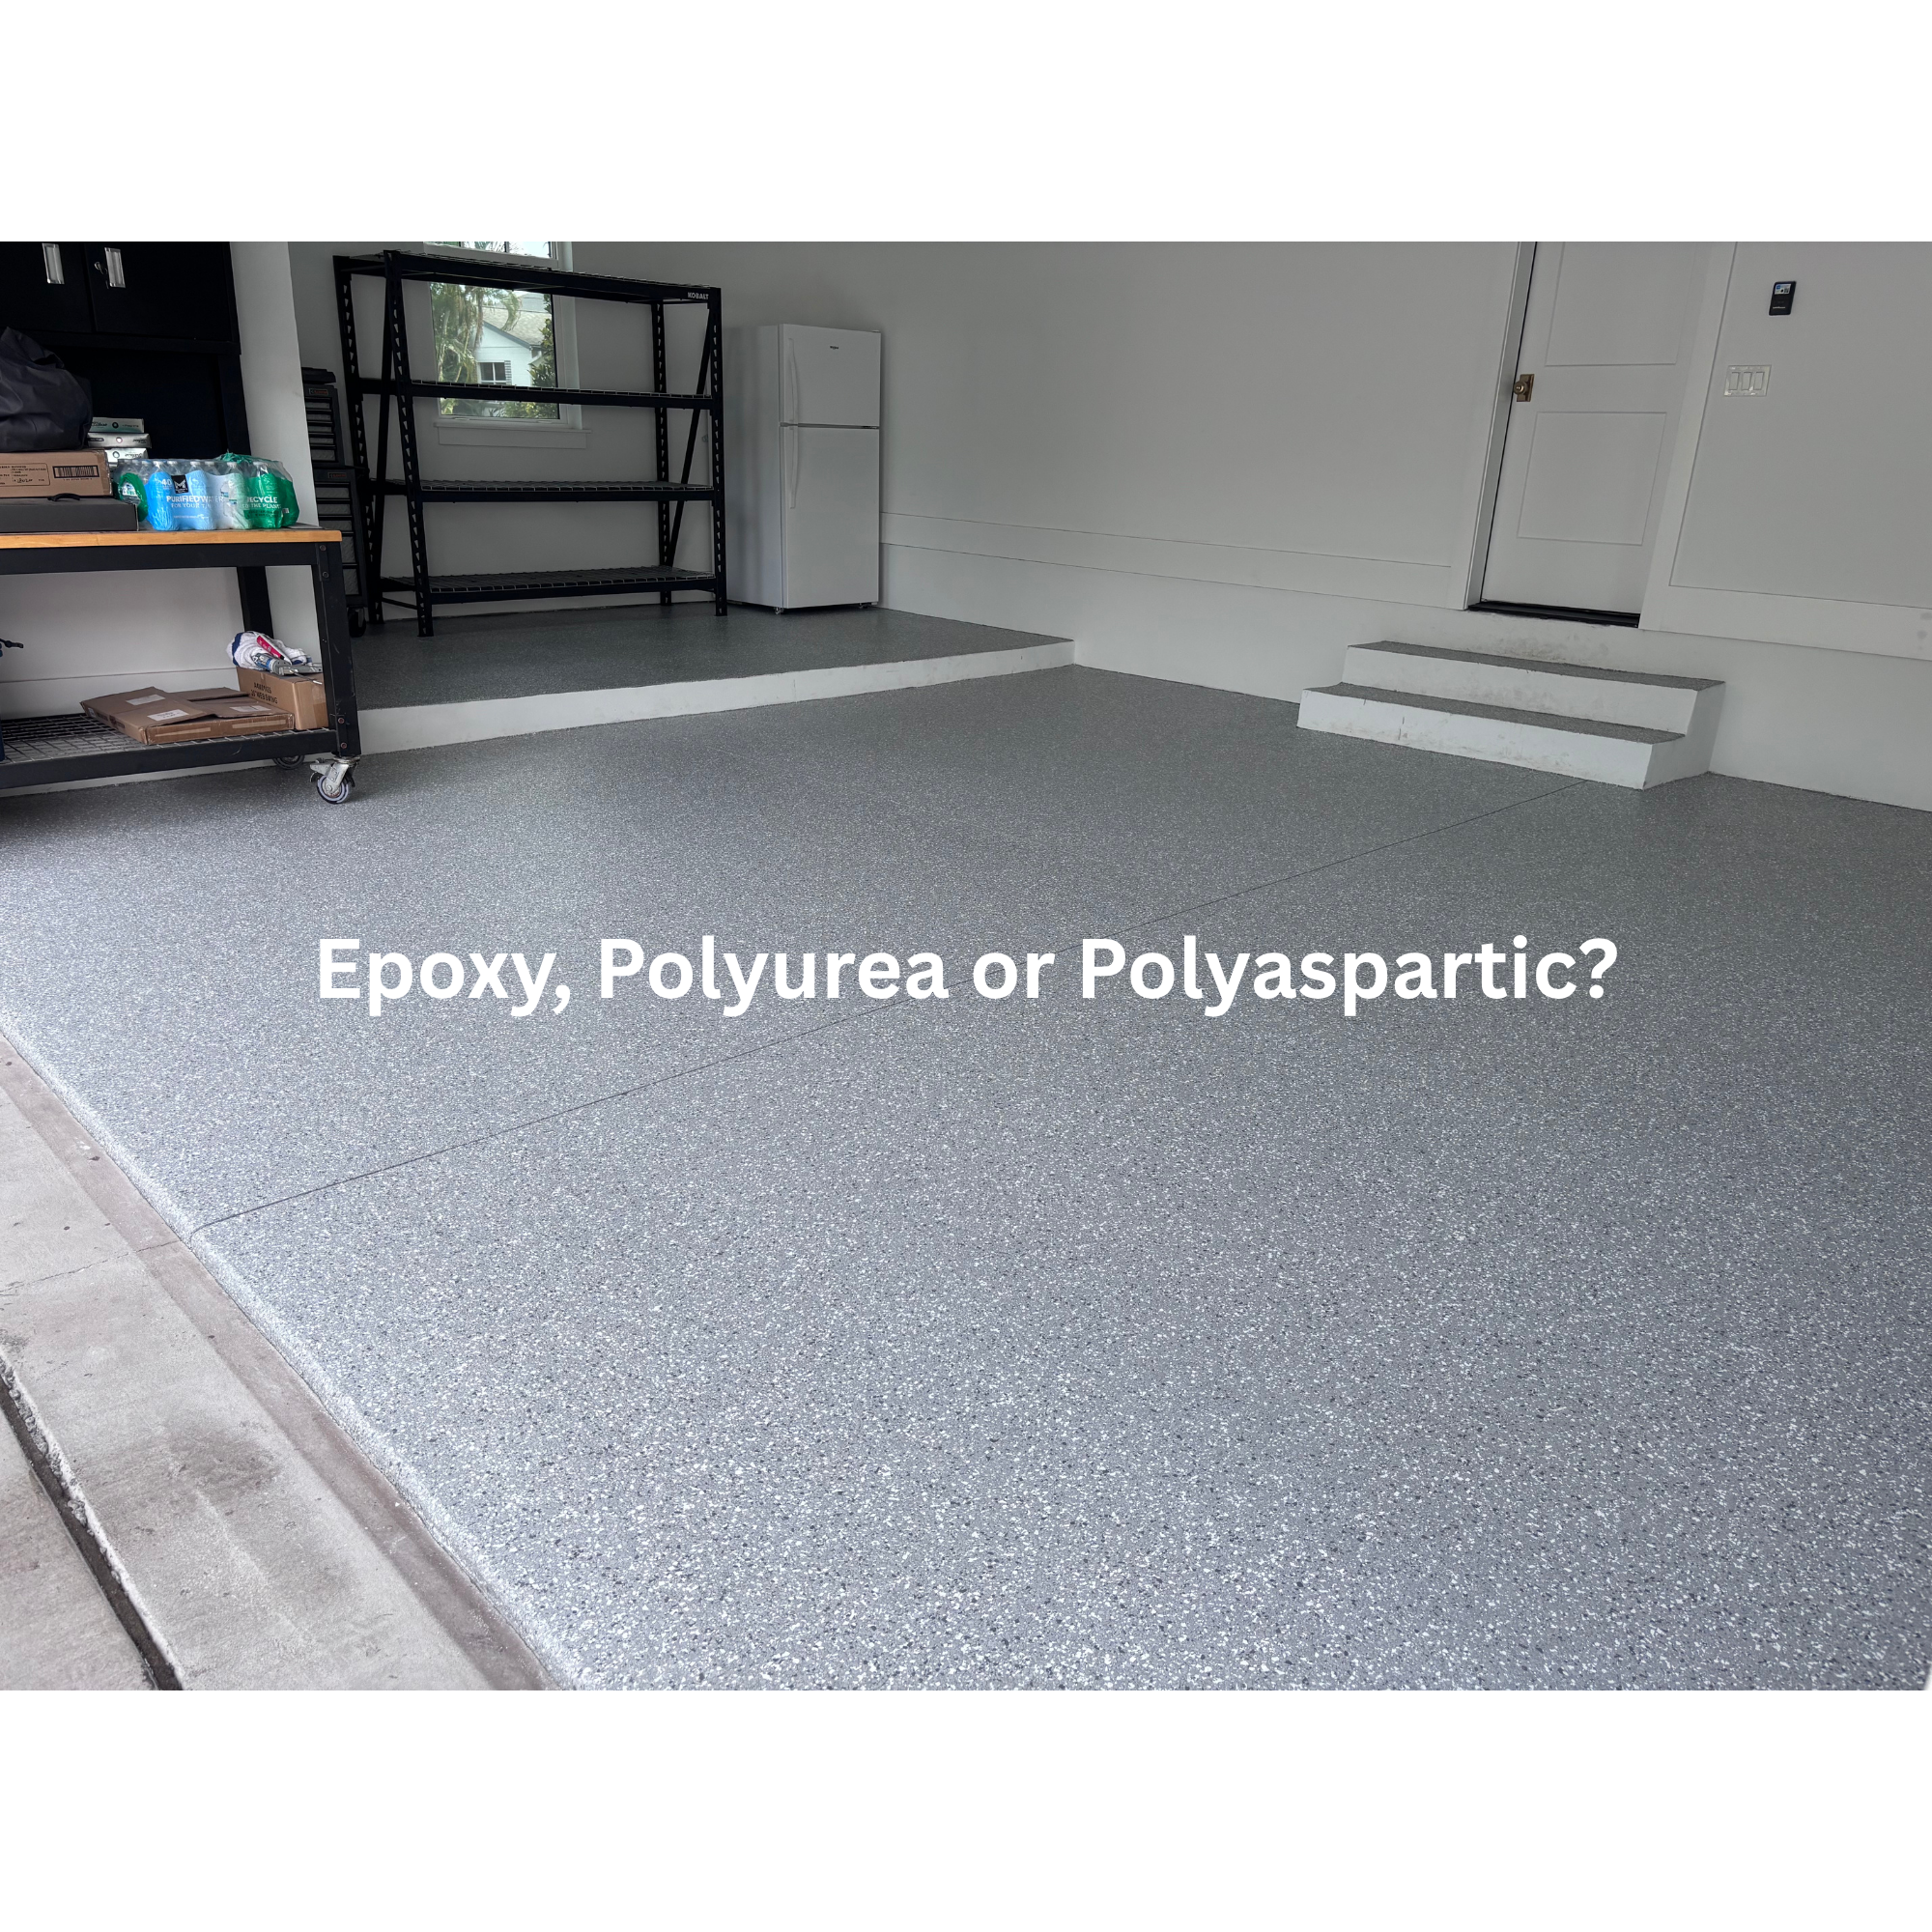
The Differences between Epoxies, Polyurea and Polyaspartic Coatings
When investing in a concrete coating system, understanding the materials being used is just as important as selecting the right contractor. Different coating technologies offer different advantages, and not all flooring systems are designed for the same environments.
Homeowners and business owners are often presented with terms such as epoxy, polyurea, polyaspartic, and urethane cement. While these products all fall under the category of resinous flooring systems, their chemical makeup, performance characteristics, and long-term durability can vary significantly.
At Signature Coatings, we believe that educated customers make better decisions. Understanding the strengths and limitations of each material can help ensure you select the flooring system best suited for your needs.
Important Factors When Evaluating Floor Coatings
When comparing different coating systems, several factors should be considered:
Adhesion to concrete
Resistance to impact and abrasion
Chemical resistance
Moisture tolerance
UV stability
Installation characteristics
Long-term durability
Overall value
While marketing claims often focus on a single feature, the overall performance of a flooring system depends on how all of these factors work together.
Epoxy Coatings
Epoxy coatings have been used for decades in commercial, industrial, and residential applications. Epoxies are formed when epoxy resins react with curing agents, creating a durable protective surface.
One of the biggest advantages of properly formulated epoxy coatings is their ability to bond strongly to concrete. High-quality industrial epoxies can provide excellent adhesion and chemical resistance when installed over properly prepared concrete surfaces.
However, not all epoxies are created equal. Many homeowner-grade products sold through retail stores contain lower solids content and thinner film builds, resulting in reduced durability and shorter service life.
Professional-grade epoxy systems are commonly used in warehouses, manufacturing facilities, and commercial spaces where strong adhesion and chemical resistance are required.
Potential limitations of epoxy coatings include slower cure times and varying levels of UV resistance. Depending on the formulation, some epoxy systems may amber or discolor when exposed to prolonged sunlight.
Polyurea Coatings
Polyurea technology was originally developed for waterproofing and corrosion protection applications and has been used for years in products such as truck bed liners, tank linings, and industrial protective coatings.
One of the primary reasons polyurea has become popular in the garage floor industry is its relatively low material cost compared to premium polyaspartic coatings. Because polyurea is less expensive to manufacture, many contractors use it as a base coat to reduce overall system costs while still marketing the floor as a "polyurea/polyaspartic system."
Polyurea also cures extremely quickly, allowing installers to complete projects in a shorter timeframe. However, this rapid cure can significantly reduce working time, leaving less opportunity to ensure complete coverage and a flawless finish.
Traditional polyurea coatings are also aromatic in nature, meaning they are not UV stable and can discolor when exposed to sunlight. This is why polyurea is commonly used as a primer or base coat rather than as the final wear surface.
While polyurea can be an effective component within certain flooring systems, homeowners should understand that not all coating systems are built with the same materials. Many companies choose polyurea because it helps lower installation costs and increase profit margins.
Polyaspartic Coatings
Polyaspartic technology has become one of the most popular choices for premium garage floor coating systems.
Polyaspartics belong to a family of aliphatic polyurea coatings but differ significantly from traditional aromatic polyureas. Their chemistry provides exceptional UV stability while maintaining excellent durability and flexibility.
One of the reasons polyaspartics have gained popularity is their ability to perform multiple functions within a flooring system. They can be used as primers, base coats, broadcast coats, and topcoats.
Advantages of polyaspartic coatings include:
Outstanding UV resistance
Excellent abrasion resistance
High chemical resistance
Strong adhesion to properly prepared concrete
Fast return-to-service times
Superior color retention
Excellent gloss retention
Unlike aromatic coatings that may yellow over time, properly formulated polyaspartics maintain their appearance even when exposed to direct sunlight.
This makes them particularly well suited for residential garages throughout Florida where UV exposure is a constant concern.
Understanding Adhesion
Adhesion is one of the most important factors influencing the lifespan of a floor coating.
Regardless of the material used, successful adhesion begins with proper concrete preparation. Diamond grinding creates a clean, porous surface profile that allows the coating to penetrate and mechanically bond to the slab.
While different coating materials exhibit different wetting characteristics, most professionally formulated systems can achieve excellent bond strength when installed over properly prepared concrete.
In many cases, coating failures attributed to product selection are actually caused by inadequate preparation, contamination, or moisture issues within the slab.
Impact Resistance and Flexibility
Garage floors experience constant abuse from vehicle traffic, tool drops, storage equipment, and daily use.
Both polyurea and polyaspartic coatings provide a degree of flexibility that can improve impact resistance compared to more rigid materials.
Many professional epoxy formulations also incorporate additives that enhance flexibility and reduce brittleness.
The ideal flooring system balances hardness and flexibility, creating a surface capable of resisting both wear and sudden impacts.
Moisture Vapor and Concrete Chemistry
Moisture is one of the most common causes of flooring failures.
Concrete slabs naturally contain moisture and soluble salts. As moisture moves through the slab, it can transport these salts toward the coating interface.
Over time, this process may weaken the bond between the coating and the concrete if the flooring system is not designed to tolerate these conditions.
Specialized moisture-mitigation epoxies are often used in commercial applications where elevated moisture vapor transmission rates exist.
Polyaspartics provide excellent chemical resistance but are not typically intended to serve as dedicated moisture-mitigation systems. Urethane cement systems generally offer strong moisture tolerance and are often selected when severe moisture conditions are present.
UV Stability and Appearance Retention
Florida homeowners should pay close attention to UV stability.
Many garages receive direct sunlight throughout the day, especially when garage doors are left open.
Traditional aromatic polyureas and many urethane-based materials will discolor when exposed to ultraviolet light.
Polyaspartic coatings utilize UV-stable chemistry that allows them to maintain their appearance, color, and gloss over time.
This is one of the primary reasons polyaspartics have become a preferred topcoat for premium garage floor systems.
Material Cost Versus Long-Term Value
Material costs vary considerably across the resinous flooring industry.
Entry-level coatings often reduce costs by utilizing lower-quality resins, thinner film builds, or reduced solids content.
Premium coating systems generally require higher-quality raw materials and more extensive installation procedures, resulting in a greater initial investment.
However, long-term value should always be considered alongside upfront cost. A flooring system that lasts significantly longer while maintaining its appearance and performance may ultimately provide a better return on investment.
Why Signature Coatings Chooses a Full Polyaspartic System
At Signature Coatings, we utilize a three-coat polyaspartic flooring system because we believe it provides the ideal combination of durability, appearance, UV stability, and long-term performance for residential garage environments.
Our system offers:
Professional diamond-ground surface preparation
Excellent concrete adhesion
Full broadcast decorative chip coverage
UV-stable performance
Fast installation and cure times
Outstanding chemical and abrasion resistance
Most importantly, we focus on proper preparation and installation practices because even the best coating materials can only perform as well as the foundation beneath them.
When installed correctly, a premium polyaspartic flooring system provides homeowners with a beautiful, durable floor designed to withstand years of daily use.
Give us a call or text Today to start your garage transformation and be confident to know that you have the BEST floor system on the market!
(727) 514-1832
DIY Garage Floor Coating Installation Guide: A Step-by-Step Homeowner's Guide
A professionally installed garage floor coating can transform your garage into a clean, durable, and attractive space. While installing a garage floor coating yourself is possible, preparation is the key to success. Most DIY failures occur because of improper surface preparation—not because of the coating itself.
In this guide, we'll walk you through everything you need to know, including the tools, materials, and installation process required to complete your own garage floor coating project.
Shopping List
Before you begin, gather the following materials and tools:
Surface Preparation Tools
Concrete grinder (different blades offer different results) Recommended to purchase a hardness test kit to know what blades to use.
Hand grinder for edges and corners
Floor scraper
Shop vacuum (HEPA preferred)
Leaf blower
Extension cords
Dust shroud for grinder
Safety glasses
Hearing protection
Respirator or dust mask
Knee pads
Repair Materials
Concrete crack repair product
Putty knife or trowel
Coating Application Tools
Mixing buckets
Drill with mixing paddle or stir sticks (depends on what product you use)
Paint brushes
18" roller frame
Roller covers (3/8" nap) per coat
Roller pole extension
Spiked shoes
Measuring cups
Painter's tape
Roller pan
5 Gallon buckets
Coating Materials
100% solids epoxy primer/base coat
Decorative vinyl flakes (your preferred color blend)
Polyaspartic or polyurethane clear topcoat
Anti-slip additive (optional)
*This system is based on your preferences but is not the Signature Coatings method.
Step 1: Empty the Garage
Remove everything from the garage, including:
Vehicles
Storage racks
Workbenches
Shelving
Floor mats
The floor must be completely accessible for grinding and coating.
Pro Tip: Take this opportunity to thoroughly organize and declutter your garage before starting.
Step 2: Inspect the Concrete
Walk the entire floor and identify:
Cracks
Pitting
Spalling
Oil stains
Previous coatings or paint
Moisture issues
Step 3: Remove Existing Coatings
If your garage floor has:
Paint
Epoxy
Sealers
Glue residue
These materials must be removed.
A coating can only bond as well as the surface underneath it. Applying a new coating over failing paint or sealer almost always leads to peeling.
Step 4: Grind the Concrete
This is the most important step of the entire project.
Grinding opens the concrete pores and creates a surface profile that allows the coating to mechanically bond to the slab.
How to Grind
Install a diamond grinding attachment.
Start at one corner of the garage.
Work in overlapping passes.
Grind the entire surface evenly.
Use a hand grinder around walls and edges.
The finished floor should have a consistent texture similar to medium-grit sandpaper.
Common DIY Mistakes
Skipping grinding entirely
Using acid etching instead of grinding
Missing edges and corners
Leaving smooth spots
Any area that isn't properly prepared can become a future failure point.
Step 5: Vacuum Thoroughly
After grinding:
Vacuum the entire floor.
Vacuum cracks and joints.
Vacuum edges and corners.
Dust left behind will interfere with adhesion and create imperfections in the finished coating.
Take your time during this step.
Step 6: Blow Out Remaining Dust
After vacuuming:
Use a leaf blower to remove remaining dust.
Blow dust out of corners and expansion joints.
Allow airborne dust to settle before proceeding.
Many professionals vacuum first and then use a blower for a final cleaning.
Step 7: Repair Cracks and Damage
Now that the concrete is clean, repair all imperfections.
Fill Cracks
Use repair material.
Fill cracks completely.
Slightly overfill if recommended.
Allow proper cure time.
Patch Damaged Areas
Use a concrete patching compound for:
Spalling
Surface divots
Pitted concrete
Allow all repairs to cure according to manufacturer instructions.
Step 8: Re-Grind Repairs
Once repairs have cured:
Grind repaired areas smooth.
Blend patches into the surrounding floor.
Vacuum and blow off dust again.
The floor should now appear uniform and ready for coating.
Step 9: Mix the Base Coat
Mixing Tips
Read manufacturer instructions carefully.
Measure accurately.
Use a drill and mixing paddle.
Mix for the specified time.
Only mix what can be applied within the product's working time.
Improper mixing can result in soft spots, poor curing, or coating failure.
Step 10: Cut In Edges
Before rolling:
Use a brush to coat edges.
Apply around walls.
Coat around door frames and obstacles.
This process is called "cutting in."
Step 11: Roll the Base Coat
Working in sections:
Pour material in ribbons.
Spread with a roller.
Maintain a wet edge.
Roll evenly.
Avoid over-rolling the material.
A consistent coating thickness is important for proper performance.
Step 12: Broadcast Decorative Flakes
While the epoxy is still wet:
Partial Broadcast
Lightly throw flakes upward.
Allow them to flutter down naturally.
Creates a speckled appearance.
Full Broadcast
Continue broadcasting until rejection.
The floor should no longer appear wet.
Creates the most durable and professional appearance.
Many homeowners choose full broadcast systems because they better hide dirt, dust, and imperfections.
Step 13: Allow Proper Cure Time
Allow the base coat to cure according to manufacturer specifications.
Avoid:
Walking on the floor too early
Touching the flakes
Exposing the floor to moisture
Temperature and humidity will affect cure times.
Step 14: Scrape Excess Flakes
If you completed a full broadcast:
Use a floor scraper.
Scrape in multiple directions.
Remove loose flakes.
Pick up access flakes and use a blower to remove remaining flakes.
This creates a smooth and uniform surface.
Step 15: Apply the Clear Topcoat
The clear coat provides:
UV protection
Chemical resistance
Scratch resistance
Easier cleaning
Application
Mix the clear coat.
Cut in edges.
Roll evenly.
Maintain a wet edge.
Step 16: Final Cure
Most DIY systems require:
Light Foot Traffic
12–24 hours
Heavy Foot Traffic
24–48 hours
Vehicle Traffic
3–7 days
Always follow the coating manufacturer's recommendations.
Maintenance Tips
A properly installed garage floor coating can last for years with minimal maintenance.
Do:
✓ Sweep regularly
✓ Clean spills promptly
✓ Use soft-bristle brooms
✓ Wash occasionally with a pH-neutral cleaner
Avoid:
✗ Dragging heavy metal objects
✗ Using harsh acids
✗ Leaving standing chemicals for extended periods
Is DIY Worth It?
Installing your own garage floor can save money, but the success of the project depends heavily on proper preparation. Grinding, repairing, and cleaning typically account for over 75% of the labor involved.
Many coating failures occur because homeowners underestimate the importance of surface preparation or choose lower-quality materials.
If you're willing to invest the time, follow the steps carefully, and use professional-grade products, you can achieve a durable and attractive garage floor that will serve your home for years to come.
Need a Professional Garage Floor Installation in Tampa Bay?
At Signature Coatings, we specialize in professionally installed garage floor coatings using industrial-grade materials and proper diamond grinding techniques. We proudly serve homeowners throughout the Tampa Bay area with durable, beautiful floor coating systems built to last. Strength, style, and a seamless finish.
Get a free quote today!!
Text or call us at (727)514-1832
“Is Polyaspartic Flooring Too Expensive? Here’s the Truth”
When homeowners start researching garage floor coatings, one of the first reactions we hear is:
“Polyaspartic sounds great… but it’s too expensive.”
And we get it—at first glance, it can look that way.
But here’s the truth:
Polyaspartic flooring isn’t expensive—it’s an investment.
Let’s break down why.
The Real Cost of “Cheaper” Options
Many homeowners consider epoxy or DIY kits because of the lower upfront price.
But what often gets overlooked is what happens after installation:
Peeling within a couple of years
Yellowing from sunlight
Chipping under daily use
Recoating or full replacement
That “cheaper” floor can quickly turn into paying twice.
What Makes Polyaspartic Different?
Polyaspartic coatings are designed for long-term performance, not short-term savings.
Here’s what you’re actually paying for:
Stronger adhesion to your concrete
Flexibility to handle temperature changes
UV stability (no yellowing)
Resistance to hot tire pickup, chips, and wear
One-day installation (less downtime, less disruption)
It’s built to handle real life—not just look good on day one.
Cost vs. Value: What Matters More?
Let’s put it into perspective:
A cheaper coating might cost less today…
…but if it fails in 2–3 years, you’re paying again.
A professionally installed polyaspartic floor can last many years longer, meaning:
No repairs
No early replacement
Better long-term appearance
That’s where the real value comes in.
Why Homeowners in Florida Choose Polyaspartic
Here in the Tampa Bay area, your garage floor deals with:
Heat ☀️
Humidity
Moisture
Heavy use
Not all coatings can handle that.
Polyaspartic systems are specifically designed to perform in harsh environments, making them a smarter choice for Florida homes.
When Polyaspartic Makes the Most Sense
Polyaspartic is the right choice if you:
Plan to stay in your home long-term or increase the value of your home if selling
Want a floor that lasts without constant repairs
Care about appearance and durability
Don’t want to deal with peeling or yellowing
Our Honest Take
At Signature Coatings, we understand budget matters.
But we also believe in being upfront:
The cheapest option is rarely the best option.
Our goal is to give you a floor that you won’t have to worry about a few years down the road.
Final Thoughts
So, is polyaspartic more expensive upfront?
Yes.
But when you look at performance, longevity, and overall value…
it’s often the most cost-effective choice you can make.
Call or Text Us Today
Thinking about upgrading your garage floor?
Contact Signature Coatings today for a free estimate and let’s find the right solution for your space.
📞 (727) 514-1832
🌐 signaturecoatings-fl.com
Strength, style, and a seamless finish.
Do DIY Garage Floor Kits Really Work? | Tampa Bay Garage Floor Experts
Myth #3: “DIY Garage Floor Kits Work Just as Well”
Garage floor coating kits from big box stores often promise professional-looking results in a weekend. Because of the convenience and lower upfront cost, many homeowners assume these DIY kits perform just as well as professionally installed systems.
Unfortunately, that’s rarely the case.
While DIY kits may improve the appearance of a garage temporarily, they typically lack the durability, preparation process, and professional-grade materials needed for a long-lasting floor.
At Signature Coatings, we frequently hear from homeowners who tried a DIY kit first and ended up needing the floor redone soon after.
The Difference in Surface Preparation
One of the biggest differences between DIY kits and professional installations is surface preparation.
Most DIY kits recommend simply cleaning the floor or using a mild acid etching solution. While this may seem sufficient, it often does not properly open the pores of the concrete for strong bonding.
Professional installers use industrial diamond grinding equipment to properly profile the concrete surface. This allows the coating to penetrate the concrete and create a much stronger bond.
Without proper preparation, coatings are more likely to experience:
Peeling
Chipping
Hot tire pickup
Premature wear
The Quality of the Materials
Another major difference is the quality and thickness of the coating products.
DIY kits are typically water-based epoxy products that are designed to be easy to apply but are often much thinner and less durable than professional-grade systems.
Professional flooring systems use higher-solids coatings and advanced materials, such as polyaspartic topcoats, that are designed to withstand heavy use, moisture, and temperature changes.
Long-Term Value vs. Short-Term Savings
While a DIY kit may appear to save money upfront, many homeowners end up needing to remove and replace the coating sooner than expected.
Once a DIY coating begins to fail, the floor usually requires extensive grinding and removal before a new system can be installed, which can increase the overall cost.
Investing in a professionally installed system from the beginning often provides better durability, appearance, and long-term value.
A Garage Floor Built to Last
A garage floor coating should do more than just look good for a short time. It should be designed to withstand daily use, vehicle traffic, moisture, and the Florida climate.
At Signature Coatings, our focus is on proper preparation, high-quality materials, and professional installation to ensure every floor we install is built to last.
If you're considering upgrading your garage floor in the Tampa Bay area, make sure you understand the differences between DIY kits and professionally installed systems before making your decision.
Check out our Gallery and CALL US TODAY to start your garage transformation!
Why Concrete Preparation Matters for Garage Floor Coatings | Tampa Bay
Myth #2: “Concrete Prep Doesn’t Matter That Much”
When it comes to garage floor coatings, one of the biggest myths homeowners hear is that concrete preparation isn’t very important. Some even believe the coating itself is what determines how long the floor lasts.
In reality, proper concrete preparation is the most important step in the entire installation process.
At Signature Coatings, we often say:
“A coating is only as strong as the surface it bonds to.”
Why Concrete Preparation Matters
Concrete may look smooth and solid, but in reality it’s a porous surface that needs to be properly prepared before any coating can bond to it.
Without proper preparation, coatings can experience problems such as:
Peeling
Flaking
Bubbling
Delamination
These failures usually have nothing to do with the coating itself — they are almost always caused by poor surface preparation.
What Proper Preparation Actually Involves
A professional garage floor installation involves much more than just cleaning the floor and applying a coating.
Proper preparation typically includes:
Diamond Grinding
This process uses industrial grinding machines to open the pores of the concrete and create a profile that allows the coating to properly bond.
Crack and Imperfection Repair
Small cracks, pits, and surface damage should be repaired before coating to ensure a smooth and long-lasting finish.
Thorough Cleaning
Dust and debris must be completely removed before coating installation.
Skipping or rushing these steps is one of the main reasons many garage floors fail prematurely.
Why Some Companies Skip This Step
Proper surface preparation requires expensive equipment, additional labor, and experience. Some installers skip or rush this step in order to complete jobs faster or reduce costs.
Unfortunately, this often leads to coatings that peel within a few years.
The Difference Professional Prep Makes
When concrete is properly prepared, a coating system can bond deeply into the surface and create a durable floor designed to last for years.
Professional surface preparation is what separates temporary coatings from long-term flooring systems.
At Signature Coatings, we take preparation seriously because we know that lasting results start from the ground up.
If you’re considering upgrading your garage floor in the Tampa Bay area, make sure the company you hire prioritizes professional concrete preparation — not just the coating itself.
Check out our gallery and call us today to start your garage floor transformation!
Garage Floor Coating Tampa Bay: Are Polyaspartic and Epoxy Really the Same? Myth vs Reality
Myth #1: “All Garage Floor Coatings Are Basically the Same”
If you’ve started researching garage floor coatings, you’ve probably heard terms like epoxy, polyaspartic, polyurea, and “one-day systems.” Many homeowners assume they’re all just different names for the same thing.
They’re not.
And choosing the wrong one can cost you thousands in premature failure.
Let’s break it down.
The Truth About Epoxy
Epoxy has been around for decades. It was once considered the gold standard for garage floors.
But epoxy has limitations:
It’s rigid and can become brittle over time
It can yellow when exposed to UV light
It has a longer cure time
It’s more sensitive to temperature and humidity during installation
In Florida’s climate, UV exposure and humidity matter.
If a garage door is open regularly, epoxy coatings can amber or discolor over time.
What Makes Polyaspartic Different?
Polyaspartic is a more advanced coating technology.
Here’s what sets it apart:
1. Superior Bond Strength
Polyaspartic penetrates and bonds into properly prepared concrete more effectively.
2. UV Stability
Unlike epoxy, polyaspartic resists yellowing from sunlight exposure.
3. Flexibility
Concrete naturally expands and contracts. A more flexible coating helps prevent cracking or delamination.
4. Faster Cure Times
Polyaspartic systems cure quickly, allowing for faster return to service.
Why Material Alone Isn’t Enough
Even the best material will fail without proper preparation and system design.
At Signature Coatings, we don’t rely on a single coat or shortcuts. We install a true three-coat polyaspartic system designed for durability and long-term performance.
Because a garage floor isn’t just decorative — it’s functional space.
What Homeowners Should Ask Before Hiring a Contractor
If you’re comparing companies, ask:
What material are you using — epoxy or polyaspartic?
How many coats are included?
Do you mechanically grind the concrete?
Is your top coat UV stable?
If they can’t clearly explain the system, that’s a red flag.
Bottom Line
Not all garage floor coatings are the same.
Some are designed to look good for a year or two.
Others are designed to perform for the long haul.
If you’re investing in your home, it’s worth understanding the difference.
Want to learn more?
Follow our weekly Myth Buster series as we break down the biggest misconceptions in the garage floor industry.
Next Week’s Topic:
“Concrete prep doesn’t matter that much.”
Check out our Gallery to see all the amazing garage transformations and contact us today for you FREE no hassle quote!